(Adan) Well, not really an edible execution device. More like a device that chops M&Ms in half. We're working on that.
It's pretty cool, for the most part. I think the general shape worked out okay, even though I didn't allow the Chief Designer to review it. I love the feel of the slider mechanism: beech makes for pretty decent linear motion systems, supposedly sliding ever more smoothly with time. I love the feel of the M&Ms seating, when they seat correctly. We need to increase the size of the M&M pocket just a hair: we're aiming for 5-6 per dose, and it's giving 3-4. And, most importantly, we need to keep them from jamming.
The coolest thing is invisible when it's assembled: I tried a new type of joinery, with dowel holes aligning with slots rather than matching dowel holes. It eliminates setups and allows for staged assembly:
All in all it's great progress. More later as it develops!
(Adan) We've just completed a quick design-build exercise: make a traditional stacking toy, but make it just a bit... different! We're excited with what we came up with.
It's based on one my dad made about a year ago. His is fantastic, no doubt, but where's the fun in straight replication? No, we had to make it ever-so-slightly different. The first way in which we differed was that we used a straight spindle instead of a tapering one. This allows more flexibility, so the child can put the rings on in any order, without being bound by society's rigid preconceived notions of stable pyramid construction :-)
In that photo, you'll also be quick to see the next big difference: on the larger rings (plates?) we added eight more holes, so the rings can be placed off center and very odd structures can be made.
This lets it start out as a simple stacking toy, but also turn into more complicated building blocks as the child graduates to that kind of play. The square plates are also sized such that each successive plate is smaller than its predecessor by an amount equal to a plate thickness. This helps make them more "useful" as building blocks, because they can easily be stacked (one on edge on top of one flat, for instance) to make level structures.
We actually don't have a shot of it in use that way yet; we made enough pieces for two of these, but only finished one... and then immediately gave it away for user testing! You may recall Oliver,
the darling child who modeled the rattle on the multicolored quilt? Well, he's moved beyond his rattle now. He's ready for bigger and more complicated things... and he sure seemed to like this.
Oh, right, some specs:
-Base size: 5.72" x 5.72"
-Height: 5.72"
-Materials:
-base (plate 1): beech
-plate 2: cedar
-plate 3: maple
-plate 4: beech
-plate 5: cedar
-plate 6: maple
-plate 7: beech
-spindle: cedar
-Finish: beeswax and mineral oil (salad bowl and cutting board finish)
I think it's pretty spiffy. What do you think?
(Adan) More playing with the lathe: I went down this morning and made a quick little cup out of the stump left over from the second top I made (day before yesterday). These tops and cups are fun and simple. My turning skills are pitiful at best, but hey: good enough for these little joys!
The turning process is pretty basic. At the moment I'm trying to just get the feel of things without going crazy and trying all the tools. As such, I'm using only a parting tool, skew, and scraper. Any self-respecting turner is groaning in pain upon reading that, I'm sure... but it's a start. I'll learn, just need a little time.
One first: this time, before boring out the hollow of the cup, I used a drill to cut a 1/2" hole in the middle. This makes the boring much easier, since you're not messing around with the zero-velocity nibs in the middle. This was previously impossible, though, as we had no tailstock chuck. Yesterday, however, I purchased a MT2 (Morse Taper #2) compatible keyless chuck... and then today, impatient for that to arrive, I researched and found our drillpress already has an MT2 taper on its chuck! So I knocked the chuck out of the drillpress and slapped it onto the lathe. Happy times ensued. There's something truly fascinating about watching a non-rotating drillbit draw curly chips out of a spinning workpiece.
So that was a little video showing the newer of the two tops spinning in its cup. The cup really isn't an ideal place for the top, but it does make some interesting wobble patterns! What do you think?
(Adan) One of our early prototypes was recently back out on the table, and we all had a good time looking at it. It's a complicated one, lemme tell ya: building blocks!
This prototyped set is made of pieces of maple, square in section, ranging in size from 1.25"x1.25"x1.25" up to 1.25"x1.25"x7.5".
These were a very early project. We've gotten a LOT more tools and skills since then. A contemporary set would look much nicer, I feel sure.
But hey, they're building blocks! They don't have to be fancy to be a lot of fun. I enjoyed myself greatly just building this reindeer. Or spaceship. I forget what it was, but it was absolutely perfect.
If we were to make another set like this I would probably want them to be made of beech. I might also consider tweaking the common dimension up to 1.375", which is apparently a standard (??) building block factor. What do you think? Oh, and how should they be packaged?
(Adan) Yesterday afternoon saw Ian and me hoisting his new lathe up onto a brand new stand we had just fabricated for it. Check it out, it's quite glam:
As glam, that is, as a stand can be when it is constructed out of a sawhorse and a 2x12! It was pretty wobbly after those initial two elements were joined, so we added the sheet of plywood you see at the bottom. That stiffened it up considerably. After a couple of sticks braced the baseplate down to the feet of the horse, it was like a rock. Sort of. Close enough, we said, and we started making some chips.
This is a "bowl" of sorts, I guess? We took turns reducing a large chunk of holly down to this size. We also tried gouging out its interior just a bit:
Pretty cool, huh? It will probably never be a completed bowl, unfortunately, but you never know. It was great fun as a practice piece.
This was my first piece. What can I say, Jennifer and I just saw Inception... what else was I going to make?? We don't have a chuck or faceplate that fits this lathe yet (on order, coming soon, don't worry), so getting this down to a point was a bit tricky.
It was a lot of fun. We don't, as a company, have a lot of need for turned parts quite yet... but we got so much entertainment out of making these little guys, we may need to invent some axisymmetric parts, post haste. Now we just need to make sure we don't get used to that "stand" and leave it there forever. Temporary, it's only meant to be temporary.
Well, the client who hired us to do some grain-contrasted inlay using that
beautiful piece of sycamore has given us permission to show some of the resulting inlay right here on our Toylog. Without further ado...
It's really turned out so beautifully, I love to look at it. Every single one of those circles is as close to perfect as my eye can distinguish, with no visible glueline... and that's 430 circles! Getting the tone to match was a struggle, so I made extras in order to be certain he would have enough to work with.
All the circles are quartersawn, and all the substrate is plainsawn. These will be part of the decorative trim on a pair of desks that are a part of a very fancy railcar restoration project.
[Adan] It's times like these that I am grateful for the Toylog's extremely broad scope. Sure, pictures of a lotus may not fall squarely in the middle of typical topic ranges, but they're enriching nonetheless.
There it is, in situ. That's the cascade in Jennifer's grandmother Fran's back yard. You would not BELIEVE the garden of which this is a part. It's the most glorious accomplishment, really outstanding. It's not just a garden, it's the whole yard. It's not just a yard, it's a gorgeously designed experience, and an ark containing representatives of a freakishly huge percentage of the world's plantlife. But we're talking today about just a single plant amidst the thousands.
Fran called me this morning, and I just happened to be finishing some errands that had taken me near her place. The light was perfect, and I went by to help her document this marvel. My little Nikon is hardly an adequate tool for this task, but I did what I could. She had her Canon on hand, so fear not: there are better pictures than these available.
Apparently it's been like this for several days, and another bloom already came and went before this one. The seedpod on a lower stalk (visible in the first two images) is all that remains.
That cone in the middle of this blossom will morph into a similar object all too soon, I'm told. Note also the little antennaed black spot amidst the pollen. That's a tiny bee, the kind I've always called a "sweat bee" though surely there's a better name. This flower was very popular with those of his ilk.
Well. It was really something. I was enthralled by the sight, and I hope some of the excitement is internets-communicable.
[Adan] Last week's Wednesday Whatzit was maybe not completely fair, or in line with typical quiz subjects. Regardless, here's what it was:
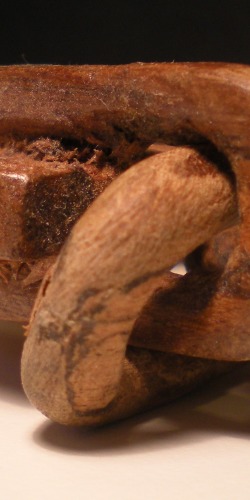
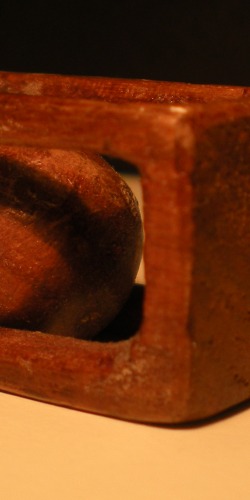
My grandfather (father's father) carved this from a single piece of cherry. He and my grandmother were both very serious woodcarvers. They really liked carving animals, and especially birds, and thankfully many of those figurines were saved and passed on to my father when his parents died. They were also legendary for carving in the living room, in front of the TV, and leaving gorgeous piles of shavings and sawdust on the floor. How cool is that?!
This, clearly, is neither bird nor beast: it's a chain, with a little ball carved into one end of it. I've seen other examples of people carving captive inclusions such as the ball, or carving chain links, but what I like most about this is the story it tells. It's very poignant, the way in which the project has been planned out, the governing pencil lines drawn... and then he worked in from the ends: maybe he started with the ball first, and actually put a dab of finish on it, just to see what it was going to look like:
Going to the chain end, the links seem to start out a little uneven and get more and more symmetric. Again, he's touched a couple of them with finish.
But to have made so much progress, and not complete it? Was it really that he was interrupted by the end of his days, or did he instead come to appreciate it in its current state as a much more interesting story than the finished product might be, and deliberately stop?
Maybe he got tired of the monotony of chain links and went back to carving the darling little bear cubs that are collected in his descendants' homes. Who can say? I think it's a lovely artifact.
[Adan] Okay, who's up for a game of "what is the larger object represented by these tightly cropped photos?"
near one end
near the other end
Okay, have at it!


