(Adan) When we made the second stacker toy prototype last week, we actually made enough parts for two of the toys... but only finished and delivered the first one. So I still have the rough, unfinished bits here, just awaiting the final steps. I thought it would be fun to post some close-ups of the cut details.
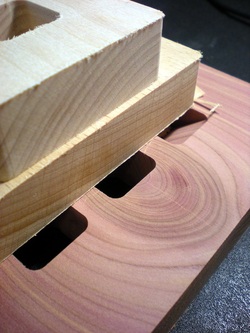
That's maple, beech, and cedar (from top to bottom). If you compare these to the images from the original stacker toy post you'll note the colors are all just a bit less rich. In part that's the lighting and my amateur photography, but the biggest difference is the finish: the one in the previous post has our beeswax + mineral oil finish applied, which gives it that nice wet look and makes all the colors pop.
As always, I'm totally in love with the cut section effect you get here, especially where you can see the grain go all warpy around that knot! Isn't that just the coolest thing? And the color variations, even without finishing? Lovely.
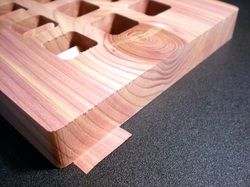
That's the orientation it had while mounted on the router. That little flap at the bottom is what remains of the "skin" that we leave (usually ~0.015") in order to hold the pieces together, even after the profiles have been cut. After removing them from the router, we flip the pieces and pass them through the drum sander. Several passes through that removes a bit more thickness, taking the skin with it and freeing up the parts.
That's the orientation it had while mounted on the router. That little flap at the bottom is what remains of the "skin" that we leave (usually ~0.015") in order to hold the pieces together, even after the profiles have been cut. After removing them from the router, we flip the pieces and pass them through the drum sander. Several passes through that removes a bit more thickness, taking the skin with it and freeing up the parts.
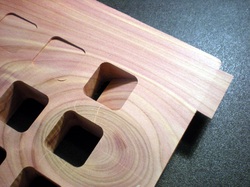
From the bottom, you can see the little remaining bits of skin in the interior holes. Those tend to get pushed down by the sanding, so they may technically be disconnected but still so snugly fitted that they don't move until you poke them. Sometimes all you have to do is blow on them and they'll go fluttering away... but that's usually an indication that you've sanded too much and the thickness is now less than you wanted it.
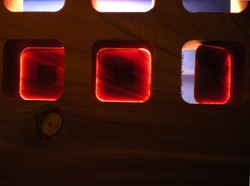
Okay, prep yourself, 'cause this last one's exciting:
Okay, prep yourself, 'cause this last one's exciting:
That's light shining through those little square flaps. One nifty thing about this is the gradient: the center of the flap, while it's passing under the sanding drum during that final separation process, has much less support than the perimeter, and thus is able to flex away from the abrasive. Sure, it gets sanded some, but the edges of the square definitely get sanded through first. That's of no consequence here, but it used to have a very interesting impact on our ukulele fabrication.
Imagine if the body portions of the ukulele are held together with a skin, like this, and we're drum sanding it apart. The soundboard will flex away from the drum, just as did the little square flaps in the image above, and we'll get a contoured soundboard instead of a flat one. That may be good for tone, or may be bad... but it'll definitely be unpredictable. So we've changed our methods for that one: no more skin-based holddown. The soundboards are now consistent. The only variations are in the wood and whatever tweaking we do to the braces.
Okay, that's it for now!


